We are often asked what finishing refers to and includes. Most of the commercial companies that we deal with are very familiar with the requirements of concrete finishing and all the variations that can be done. A lot of homeowners though, have questions about it.
 Contrary to popular opinion, the people that drive around with the big cement trucks frequently have nothing to do with finishing aspect of it – they just deliver cement to companies like Ocmulgee. Concrete finishers like Ocmulgee are the ones that make that concrete do all the tricks.
Not every project requires a company like ours so some of this information might be useful if you are thinking about doing your own small project. When it comes to bigger projects though, Ocmulgee should be your FIRST call for professional concrete finishing in Raleigh NC.
Cement slabs are not usually just poured for fun, so if you are reading this thinking, “I want to do this myself”, we really recommend starting with something small like a trash can pad or a small slab for a dog house, etc. DON’T decide you want to be a DIYer and get in over your head. Cement pours pretty easy, but if it doesn’t turn out the way you want it, it is NOT easy to get rid of.
The Pour
First, your concrete. Depending on your project, you may be creating your own mix of portland cement, aggregate, sand and even ash – or you may just be calling a concrete company to run a truck over to you. However you do it, weather and temperatures will change up the pouring, finishing and finally, curing of the concrete. Seek advice from the manufacturer on the particular details. At Ocmulgee, we bring in cement based on what our needs for any particular job are going to be and what results we are trying to achieve.
Screeding the Pour
Screeding – start pronto after pouring. What this really does is drive any larger aggregate down into the mixture and level out the surface. Cement does a nice job of self-leveling, but let’s face it, it’s not water and could use some help here. The screeding process is exactly that – roughing in your cement so to speak.
Usually something like a 2×4 is going to be used for home-sized projects. Two workers will grab either end of the 2×4 and resting it on top of the form, and then work it back and forth down the length of the form. This will get the aggregate pushed down and fill in any low spots and knock down any high spots that are there. At this point, your concrete should be even with the top all the way down your form.
Break out the Darby
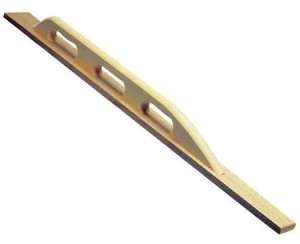 Now, you’ll be using what is known as a “darby.” If you have just a one-off type project, you can make a quick darby with a piece of 1×4 lumber and put on a handle. If you’re doing a bigger slab, you may want to pop on two handles. This is a perfect solution if you’re doing this yourself and you’re not going to be doing anything else. If you’re going to be doing this a LOT – like WE do at Ocmulgee Concrete Finishing, then you might want to invest in something a little fancier.
Commercial darbies are more solid and designed for continuing use. Regardless, your darby should be able to cover just beyond half the distance across your slab pour. Whereas screeding above was all about “roughing in” your concrete, the darby is going to start fine tuning your concrete. A parallel would be in woodworking. To get the heavy work done, you’ll end up using using 40/80 grit sandpaper, then moving to 100/120 to get rid of the marks left by the 40, and then on up to 400 to really finish it off and get that perfect finish. The darby is your 100/120 step here.
The darby will continue the process of driving the bigger aggregate down and leaving a yet smoother finish. Get rid of the bigger marks left by screeding. Sweep the darby in wide arcs along the surface of the concrete. Don’t go crazy here. The more you do this, the more the sand and finer particles will end up on the top of your concrete and give you a less than desirable finish. A few swipes at most is our rule of thumb.
Bleeding – Always Happens
Water will end up appearing on top of your cement after you’ve gotten through these two steps. It’s entirely normal and will be fine. The water will end up reabsorbing into the concrete, so don’t start worrying about it or trying to swipe it off – just leave it alone. It will be fine.
It is very very important to wait before continuing. Wait until all the water has been reabsorbed. Trying to edge and finish things up before the water has disappeared is going to end up giving you a weaker surface.
Edge your Project
 The concrete will begin to harden, when all the water has been reabsorbed. When you press down into the concrete with your thumb and all you get is about a quarter inch impression, you’re ready to start the last few steps. If the project is something like a driveway, patio or sidewalk, then you’ll likely want to run a simple concrete edging tool around the outside of the slab. If you’re doing a floor, you don’t need to do this – hard edges are fine. When concrete is being used for something that is going to potentially be walked on or traversed, the likelihood of chipping away the edges is much smaller when it’s been rounded properly.
For commercial concrete projects, we have equipment that handles this quickly and efficiently – curbs, for example.
Get Your Groove IN
So why DO we need grooves in concrete? Controlled cracking of the concrete. Cracking is GOING to happen as it expands and contracts over the years, and grooving gives the concrete someplace to actually crack/break that we WANT it to. Grooves should be about a quarter the depth of the actual slab. So if you have a 4 inch depth on the pad, then your groove should be an inch deep.
Slabs like sidewalks will need to be grooved about every four feet or so. Garages and driveways – you can drag those out further to perhaps every ten feet. Use a straight edge to create your grooving so you don’t end up with some crazy angles in there forever.
Finally – Floating or Troweling
Last step – get rid of all the marks left by the edging process and create the finished surface of the concrete. You’ll want to either float your surface with a wooden float or trowel it for a smoother finish. You can get a rougher feel with just floating the concrete. Sidewalks for example are going to be a lot easier to walk on if there is some roughness in there. Give your sidewalk a “glass” finish and you’ll inevitably have someone slip fall whenever it gets wet. Think carefully about the finishing procedures you want to use.
If you do want something even smoother, like an inside floor, you may want to finish up with some troweling. For most residential projects, a hand trowel is the way to go. This can be done as many as three different times to give a smooth glassy type finish.
Let it cure
Yes, you could feasibly walk on concrete in just a few hours. Concrete in normal North Carolina summers at 90 degrees can firm up in just a few hours. That doesn’t mean it’s time to open it on up for traffic though. About a week is the normal time to fully cure depending on the depth of pour, size of slab and temperatures. Full strength should be reached in 5-7 days though and after that, it should be ready to handle whatever you throw at it.
As in the case of a driveway, if you happen to walk on it the next day, you’re not going to blow the project. If you drive your CAR across it, you may. Let it cure properly and thoroughly for at LEAST 5 days. If you’ve gone through all of this, or hired a company like Ocmulgee to do a driveway or other cement slab for you, get your money’s worth by letting your slab fully cure before you expose it to stress.